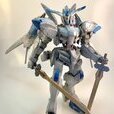
Roromi 417 Posted April 29, 2021 Share Posted April 29, 2021 So after a long hiatus due to back injury I’m back to building some Gunpla! So far she’s been an interesting build. A little bit of Déjà vu to the Red Frame which is to be expected for this. It is certainly one of the shiniest kits I’ve ever dealt with, which makes sanding down the parts both more crucial and more painful to do, but these nub marks can be a devil to get out, especially for something so shiny. On the note of nub marks, I’ve added a new tool to my arsenal and I cannot recommend it enough. Especially if you do straight builds and don’t paint. The glass file is quite remarkable at greatly diminishing nub marks. Between my earlier technique with the Xacto knife and this I can sometimes even get the marks to nearly disappear. It might be hard to show with pictures but trust me there’s a difference. I’m taking a more half measure approach in this build in the interest of saving time. Since I’m a little bit more familiar with the kit I’m only building half the limbs and only partially putting together the chest. This will help me identify any parts I might want to customize on the full build (Which I doubt I’ll do) while letting me save time from fully building the whole thing just to take it apart later. I am separating everything accordingly though so I when I paint I’ll have a good idea of what parts go where. I learned awhile ago that it’s good to paint limbs together (for example I want to paint the legs and all their parts in the same go around). I’m sad to say that I pulled a stupid stunt and unless the part miraculously reappears I may have thrown away the connecting joint for the entire mobile suit (who can blame me there are a TON of runners!). While dismayed as I am, I can’t let circumstances dictate my limitations. I’ve already concocted a plan to salvage this particular project, and all it will take is a helping hand from a distant relative… Stay tuned for more Astray business! If things go as I hope the next part should be particularly exciting and new! 2 Quote Link to comment Share on other sites More sharing options...
Roromi 417 Posted May 3, 2021 Author Share Posted May 3, 2021 So I’m trail blazing here! We’re going to try “cloning” the hip from red frame to use on Gold Frame. you can see Red Frame doesn’t want to help... But we’re only borrowing the hip... I forgot to take a picture before putting them in the water but we’re using a reusable clay molding material. It arrives in like clear plastic cubes. You dunk them in hot (like boiling) water for 3 minutes then it becomes malleable. you then press the part you want to copy into the material and let it cool down and set. Then you get a second half of the material and enclose the whole thing. This makes a crude but simple mold of the part you want. Then comes our material. In this case it’s milliput. I suspect if you need to then you could use any two part epoxy putty. This stuff is advertised as hardening to the strength of porcelain, which isn’t bad for this scale. Cut two equal parts then combine by kneading the two parts together. when you do that for about 5 minutes you then shove it into the molds and put the two parts of the mold together. Be careful to to twist the molds themselves too much. Then let things set for about 4 hours. I found overnight works best. Now for my first attempt I put way too much clay in there. But the proof of concept is there. Next step is the clean the flashing (the excess material). When fully dry the material really is quite hard. I decided to make a second run with less material. Time will tell if this will actually work. I’ll keep everyone posted when I actually paint and put it in the real deal! Stay tuned for more Gold Frame developments! 2 Quote Link to comment Share on other sites More sharing options...
Roromi 417 Posted July 6, 2021 Author Share Posted July 6, 2021 So I’ve been busy again, which in turn has led to some delay on Gold Frame yet again. I’ve been really anxious to see how well my cloned piece will work. To be honest, I almost find the rigidity of the new piece to be almost a hindrance. Of course when I drilled out the hole I did it a little bit too big so the connection was loose. Sadly I won’t fully know how well the part works until it is fully assembled. I was pleased to see that a layer of paint did fix the connection issues I was having to the top half of the body (that and a healthy layering of paint to thicken the pieces up). I’m trying to coordinate some of the parts to how I did red frame so I’m making the inner frame entirely Copper. I think this looks fun when it is peaking out from beneath the layers of armor. I also did a copper base for all the red parts before using good old “clear red” for some candy coating. I don’t know if I’ve said it before but there are a TON of parts for this kit, so it’s going to take some strategizing to get it all painted effectively. What this means is I don’t have enough clips to prime and paint everything together so I gotta divide and conquer by parts. With the Copper and Red done now I can move to the tell tale gold parts for the kits! I was initially going to just use the simple Gold paint but then decided to throw in some of the Titanium Gold color I had around (remembering that I had used it for parts of Red Frame too). Between these two coats of gold and a selective layering of some Smoke color I’ll have a nice break up of the color to add some significant depth and variance to the parts (I only applied the smoke to select portions of each color). All together there’s probably 4 different shades of gold. I’m starting to get excited to see things coming together! Up next: Metal colors for the gray parts, “different” black for the Blitz arm, and a shinier black for the rest of the parts (maybe two different tones of black?) Stay tuned for more of your Gold Frame fix! We’ll be reaching the end most likely this month! Quote Link to comment Share on other sites More sharing options...
Roromi 417 Posted July 12, 2021 Author Share Posted July 12, 2021 The big reveal! Mind you I still need to detail and what not but this is when things really start to come together! First we did some painting of course! Tried a few new colors this time. Flat black might be one of my new favorites! Things are finally put together! Here we hit a snag! That replacement hip was going to brittle on the skinny parts and I had a feeling it wouldn’t work quite the same with the hip armor. I admittedly had to resort to some super glue to keep the hip armor on. They won’t move around as much but they’ll stick on. I feel like half this kit is wings! They’re massive! Finally some clear coat to lock in the paint! And the reveal! All that’s left to do is add some detailing! I’m hoping to add a bit of of enamel paint for weathering along with some stickers. We’ll see what happens! Stay tuned! Quote Link to comment Share on other sites More sharing options...
Roromi 417 Posted July 22, 2021 Author Share Posted July 22, 2021 He battle is real! Finally did a final clear coat and it’s time for fancy shots! I like to attempt to do subtle hints of when I make my kits. For this one intentionally didn’t weather the Blitz arm out of the idea that it has PS armor so I’d imagine it not getting all ragged like the rest of the suit. Overall this was a fun kit! It had its share of ups and downs and definitely took longer than I originally wanted but I’m glad I can pose her alongside red frame. I feel like it’s a little fragile but it hasn’t stood out to me anymore than any other kits I’ve got. It definitely needs an action base to shine for sure! I’d recommend the kit simply out of the idea that you’re getting a lot of bang for your buck! Up next! Hang onto your handbaskets because Toto we aren’t in Kansas anymore! Quote Link to comment Share on other sites More sharing options...
Roromi 417 Posted January 26, 2022 Author Share Posted January 26, 2022 I haven’t forgotten this thread! I’m still slowly picking away at the twins and I’m hoping to have some substantial leeway here soon with at least one of the kits! In the meantime here’s some backlog kits that deserve some limelight! my wife got me a pair of Godhand nippers and it inspired me to finish the gold boy I got awhile back! I feel like I might do some more detailing in the future but I’m largely satisfied with how it turned out! Overall a fun very neat kit and easily an attention grabber on my shelf! I also finally finished the Brave I had gotten awhile back. I may still do a few things but I’m a little mixed on the kit. I present my “Mass Production” Brave! I did some scribing on a few parts and spent some time adding the extra parts on the back. Overall I’d say this kit was pretty good minus a few exceptions. One manly being that they didn’t give a clear beam saber (hence him borrowing a different one). There’s also a weird thing going on with the left bicep where the plastic is basically coming apart, don’t know why! The biggest gripe I have would the the hip joint. It took me entirely too long to not only figure out how it connects but it was one of those times where I knew I’d only be getting it together once lol. That aside, this kit is just shy of being phenomenal for an HG. The articulation is pretty nice! The thrusters bits are just cool! The design it awesome! Overall I’d recommend the kit! Stay tuned for more OZ units coming your way! Quote Link to comment Share on other sites More sharing options...


Recommended Posts
Join the conversation
You can post now and register later. If you have an account, sign in now to post with your account.