Roromi 417 Posted October 26, 2020 Share Posted October 26, 2020 (edited) I thought I’d take a different approach with my RG Red Frame kit and try to document it more fully here. This was a wonderful birthday present from my wife! Here’s a picture of my set up and tools. To recap some of what I’ve done already I’ve complete the lower half of the unit so far. The great thing with these RG kits are the inner frame. At first glance I assumed more of the frame would be exposed on this particular unit, but I’ve been pleasantly surprised by the amount of armor on the limbs. Still while I don’t enjoy exposing the frame I like to at least prep the parts as best as I could. I’ve adopted the technique of cleaning up these nub marks with an Xacto knife, but not the way most might think. I’ll angle the blade and basically scrap away from the cutting end. while it doesn’t always remove the mark I find it has a pretty good ratio of success. Besides my goal is more or less to make the surface even since I’ll end up painting everything anyways. To really get it clean I’ll use some sand paper, or in this case a nail file. Typically I use two different grits, while the nail file is finer than some grades it still eats up the surface some. What I’ll do after the tougher stuff is follow up with a piece of wet sand paper (I feel like this is 1000 grit, but I forgot I’ve had it for so long). Wet sand paper is great because you can use it dry like this, and later (typically between paint coats) you can use it wet with water to make an even finer finish. Anyone whose put an RG together can attest to the frame plastic being a softer material than the rest of the pieces but the same technique works for the regular parts as well After.... It’s worth noting that not every time I will sand a piece, sometimes it’ll clean up just fine with the blade. There’s not a whole lot of scribing and what not that I can do with this kit but I suspect I can make it shine once I get to painting it! Right now the plan is to assemble the kit together vanilla then take it apart for painting. Stay tuned for more developments as they come! Edited October 26, 2020 by Roromi 1 Quote Link to comment Share on other sites More sharing options...
Roromi 417 Posted November 6, 2020 Author Share Posted November 6, 2020 So I’ve made some progress since last time! I should point out a comment I made earlier about sanding. I do in fact sand each piece, I just don’t use rough grit on every piece. I use my (dry) wet sand paper on every piece. I’ll do my best to get the reflective sheen off each piece. There are several reason for this, all relating to painting. Any plastic that comes from a mold will typically have a type of mold release on them. This residue doesn’t play nicely with paint. Is it impossible to paint by not sanding? No. Is it better for paint to sand? Yes. It may be a minute difference but it will change the texture some, which is a good thing in my opinion. For the record this waist… Oye was it bad getting connected. I had heard stories and I’m terrified of it coming apart again. I think when I finish it all up I’m gonna just super glue it together. I’d say I got everything together that I want together. Where’s the head? Still on the runner I’m not going to put it together because heads are so fragile and I’m scared I’d legitimately break something. Same story with the sword, it’s so unique I don’t want to flub it up. At this point I’m really going to look it over and see if I can even scribe anywhere. I’m tempted to maybe try some small hole scribes maybe. The other thing I’ll likely do is scribe lines to even seam lines out, or deepen existing lines or features. This kit is so layered and detail it’s impressive the scale of depth something so small can have. There isn’t a flat area I could readily edit like I would say the Zeta. Stay tuned as I inch my way towards the exciting parts of painting. 1 Quote Link to comment Share on other sites More sharing options...
Roromi 417 Posted November 16, 2020 Author Share Posted November 16, 2020 (edited) Ok so here’s a small update. I looked everything over and looked to see if there was anything worth scribing. Before I screw things up I practiced doing the “light switch” scribe in a piece of of the runner. As you may or may not be able to tell I wasn’t doing a good job, so I decided not to try it on this kit. I did decide to scribe normally by the ankle to try and even out an existing piece separation line. I also added some detail on the feet but that was all I opted to do. This kit was just too busy to really do much else. With all the scribing done it was time to take it all apart! Now I say this as much to myself as I do to anyone kind enough to read this: patience it a virtue. I almost snapped the forearm armor trying to get it back off. You might be able to see the stress mark on the part. With that drama out of the way I finished taking the last parts off the runners, and sanded them down. I then marked and separated everything by the colors I want to do. Now the deceiving thing about this is that some colors are needed for painting in others. For example I want to candy coat a lot of the red which can require between 3-4 layers of paint. By my rough estimate this project may end up taking between 9-12 different layers of paint in total. Of course we’ll see if expectations meet reality. Next step is to clip everything up, then add primer! Stay tuned! Edited November 16, 2020 by Roromi 1 Quote Link to comment Share on other sites More sharing options...
Roromi 417 Posted November 27, 2020 Author Share Posted November 27, 2020 May as well update as I wait for turkey! Clipping the parts on can be a bit tedious and even challenging. I made my clips by hot gluing skewers to electric clips. I have a few skewers just bare so I can use the pointy ends too. Some parts I had to get creative with like this shoulder armor, there wasn’t an area I could clip or poke through so instead of using hot glue I decided to try making this ball of play do from my kids to try and fit the part. It’s a little loose but seems to be doing the job for the most part. Now that everything is clipped on (well half of everything really I don’t have enough clips for the whole kit but I’m dividing it by colors being painted), it is now time to prime the parts! Priming is more like spray painting (I forgot to picture the can but it is like spray paint). So I just make sure I stay a few inches away, and spray at different angles. I don’t have to hit everything perfectly. Primer basically acts like a glue for paint, paired with the sanding it’ll help the paint stick firmly on the surface. A misconception is that “oh paint will stick on whatever” and for the most part it’s true but it’s the end texture that you’re trying to overcome with the sanding and primer. I’ve had bad experiences spray painting helmets and having the paint act up incorrectly by neglecting to do those steps. So there are three parts I’m trying to paint here. One is the frame itself, the next is one shade of red (metallic), and the last part are parts I actually want black. Now you may find yourself asking “why are you painting it all black?” I must admit this is something new I’m trying but the idea is that (for some reason) metallic paints show up better with a glossy black undercoat. Unfortunately all I have is semi-glass and matte black but I’m giving the semi-gloss a try. If nothing else it should help with the final colors in some way. One thing I always try to do when paining a color is try to get all sides of a piece, even the underside that typically won’t be seen. The reason for this is because there are often crevices or angles that you may not consider as being visible or important but low and behold it will be evident if you don’t paint it! I may not do the best coat for undersides but I’ll still hit the hose spots up. Next coat will be for metallic colors for the red and inner frame. 1 Quote Link to comment Share on other sites More sharing options...
Roromi 417 Posted December 5, 2020 Author Share Posted December 5, 2020 (edited) I love metallic paints! With that said you can see I decided to do a base coat of lovely copper for this build. Now copper hardly feels like a battle flavor color but it will have its purpose. I must admit I don’t think painting the parts black helped in the way it was sold to me but I did realize the advantage early on in the copper coat in that it saves me a layer of pre-shading, something I was dreading to do with all the tiny pieces of this build. What is pre-shading? Basically it is when you paint the edges/crevices of a part black; then when you paint the real color over the piece you intentionally don’t completely cover to do it looks “shaded”. It’s a process I’m still working to perfect but I appreciate what it does in the end. When I preshaded my wing Gundam I did the metal layer then the black, this way is a little in reverse but for these small parts it works pretty good I think (you’ll see). I’ll likely put another coat on the frame to address the odd spots I neglected to detail the method to how I airbrush last time. I’ve been using acrylic paints, specifically Tamiya. To do the coveted “candy coat” I’ve been using this awesome clear red! Candy coats work best over metallic layers, with red the darker the metal the better. Another thing to note is how much more resource consuming clear coats can be. Typically you’re going to use a lot more clear paint than normal paint. Some other key things to note: I set the PSI of my air pump around 15, before I was doing 20 but softer seems to be better, and the harder you have it blow out the more likely you are to knock pieces around on your clips. Another thing to note is the ratio of paint to thinner: 1 part thinner for 2 parts paint. I’ve done my research and found out that good old Isopropyl Alcohol is a fantastic paint thinner for acrylics. Not only do I mix these together with my nifty suction tools but measure with these tubes as well. Overall I’m very happy with this coat of red! Slowly but surely I’ll knock out more colors and get things moving. I think the next color I’ll do will be a more traditional red on different parts. With this last part you can see the sort of pre-shading effect I was able to accomplish this time around I think. There isn’t really much more I will do for these parts beyond clear coating once I’m done. stay tuned for more exciting colors! Edited December 5, 2020 by Roromi 1 Quote Link to comment Share on other sites More sharing options...
Roromi 417 Posted December 15, 2020 Author Share Posted December 15, 2020 Just a small update today! By my guess there’s only 3-4 more colors I got left to paint for this kit! Then decals and top coating! I did my normal red and decided to give it a coat of the clear red just to see what it would do. As you can see it made a rather glossy looking coat which at at glance doesn’t look all that different from the metal candy coat but there’s definitely a difference that will be noticeable when put together. You can also see I made a bit of a mistake and coated perhaps too quickly in my impatience. There’s a “waviness” you can see with the paint and I think that’s from not letting it sit long enough before changing the layer of paint. Red has also been a bit of an elusive color for me to perfect. I think next time I paint it I need to not paint the base black since it seems to really taint the red that goes over it, this shade was perhaps much darker than I intended, but lesson learned. I was getting ready to paint the white parts by trying to poor man panel line parts with my paint pen. I tried something similar with the Zeta gundam and didn’t notice much difference but I thought I’d try it again to see if it will help at all this go around. This isn’t true pre-shading, but it did help give me an idea of what I can attempt to hit with my airbrush to preshade with paint. I’ll go into greater detail about the pre-shading technique in my next post. I would have had more to report had my loyal compressor for many years didn’t end up in smoke when I was prepping to paint last time. I had to run out and get a replacement pump instead of paint. Believe me when I say I got my use out of my old one! That’s all for today, stay tuned! 1 Quote Link to comment Share on other sites More sharing options...
Roromi 417 Posted December 29, 2020 Author Share Posted December 29, 2020 Alright we’re just about there! But I digress I’ll show what I did to get to the end. As I’ve alluded to before we’ll talk about preshading. The basic idea is to outline a part with black or dark color. You can see with this knee piece by what I mean. I’ll usually paint the inside, again because you just never know. Typically I try not to hit parts I’m pre shading head on but rather from the side. Now when we switch to the actual color we want to paint the part I’ll paint from the opposite or perpendicular direction. This shoulder piece ended up pretty well imo. I could have done a better job or course but you can see how the one side is darker than the other. You can see with the shield how I shaded the middle part and painted over it. The trick with the top coat is to do it lightly and almost intentionally do a “crappy job” painting the real cool on. This way you let the shaded tones to bleed through. Here’s the same knee piece. I may have done too much white but it still looks good imo. The last thing I did was opt to add a layer is clear “smoke” to some parts. The smoke is the same as the clear red I used earlier just “black”. I did it to these parts to break them up from similarly colored parts to add some variety. Now that we’ve completed painting we can move on to final assembly! I really like details this kit has. It’s just layers of layers of details both hidden and visible and I think it’s amazing. For example the kanji on the blade is just spectacular even though it likely won’t see the light of day again. As I handle the kit at this point I’m wearing gloves just to prevent the oils from my hands interacting with the paint. At last the fully assembled kit. So why the off colored arm? MINOR SPOILERS: so in the comic Red Frame fights an opponent and gets its right arm destroyed in the fight. They then replace that arm with the arm from Gold Frame. They never explicitly say that they painted the replacement arm red so I decided to run with that idea END SPOILERS. This is getting close to done, we still have stickers to put on though. But first though we gotta top coat it with a semi gloss clear coat. This will protect the kit from having the paint rubbed off by my grubby hands. When I’m done with the stickers I’ll do another coat too. Now for stickers, I’m always amazed by how much this can elevate a kit. Little by little. Just had a few more bits to do like add some panel lining and other stickers. But with that said, I dare say Red Frame is done! One last top coat of semi gloss then it’s off for some pictures! stay tuned for the exciting conclusion of Red Frame Rising! 1 Quote Link to comment Share on other sites More sharing options...
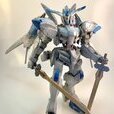
Roromi 417 Posted January 3, 2021 Author Share Posted January 3, 2021 Alright nothing but glory shots! Thank you everyone for following me along this journey! Up next is Gold Frame and a secret one which I hope to reveal once I get! I will say this about the RG Red Frame, it is a fantastic kit that lives up to my expectations if not surpasses them. There are layers and layers one detail that leaves little to be desired. I highly recommend this to anyone else! 1 Quote Link to comment Share on other sites More sharing options...


Recommended Posts
Join the conversation
You can post now and register later. If you have an account, sign in now to post with your account.